How to Set Up Your Email Provider (SMTP)
To ensure automated B2B notification emails from your store (such as registration confirmations and account approval alerts) are delivered reliably directly to your customers' primary inbox instead of their Spam folders, you should configure your own SMTP server.
⚠️ Required Setup: Wi2B does not send B2B notification emails natively from the app. Therefore, you must configure your own SMTP server to send automated emails (such as registration confirmations and account approval alerts) to your B2B customers.
Benefits of SMTP Configuration
Setting up your own SMTP server brings key benefits to your store operations:
- Improve Email Deliverability (Avoid Spam): Emails sent from your own verified domain are far more trusted by email clients like Gmail and Outlook, helping them land directly in your customers' primary inbox instead of the Spam folder.
- Professional Branding: Customers receive notifications directly from an email address under your store's own domain (e.g.,
sales@yourstore.com), strengthening brand credibility. - Ownership and Security: You maintain full control over your email delivery history and safeguard your data through your own server.
Explaining Technical Terms Simply
To help you set up easily without getting overwhelmed by tech jargon, here is a simple analogy for each setting:
- SMTP (Simple Mail Transfer Protocol): Think of this as the postal delivery system. When you send a letter, SMTP is the process of packaging it up and routing it through the postmen.
- Host: The server address of your email service provider (e.g.,
smtp.gmail.comfor Gmail). It tells the system where to drop off your email so it can be delivered. - Encode (Encryption): Think of this as putting your letter in a locked safe before mailing. There are three options: None, SSL, and TLS (two high-security locking methods that protect your email data).
- Port: The intake window of the post office. Port
587is typically used for TLS-secured mail, while port465is used for SSL. - SMTP password: Usually an App Password generated inside your email provider account settings. This gives the app permission to send mail on your behalf safely without exposing your main password.
Step 1: Navigate to SMTP Settings
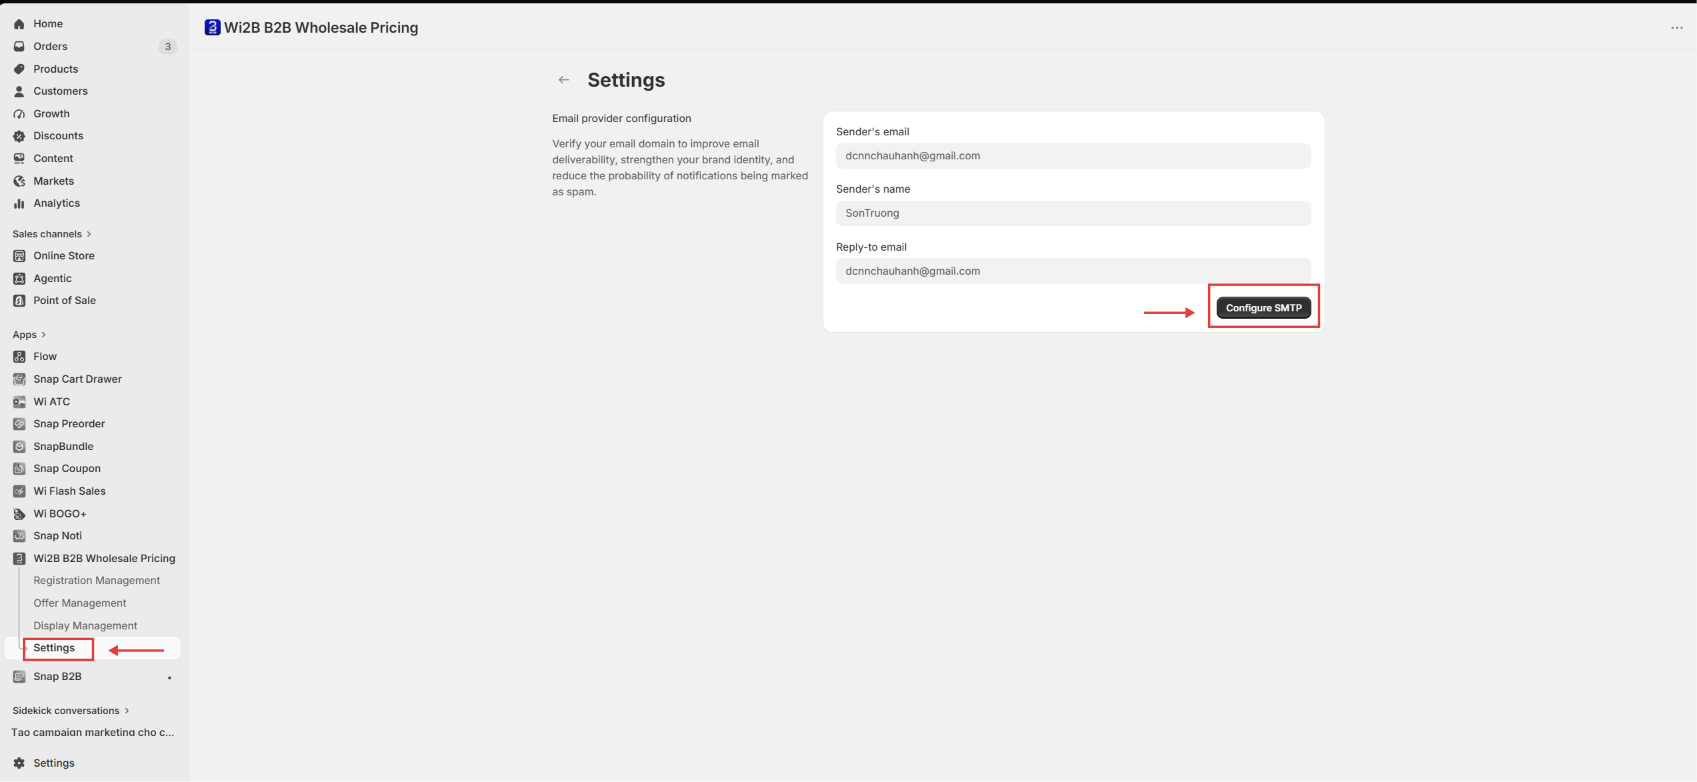
- From the left navigation sidebar in the Wi2B app, click on Settings.
- Scroll to the Email provider configuration section.
- You will see three default fields displaying:
- Sender's email: The email address shown to your customers.
- Sender's name: The display name of the sender (defaults to your store name).
- Reply-to email: The email address that receives customer replies.
- Click the Configure SMTP button at the bottom right.
Step 2: Enter Your Server Configuration
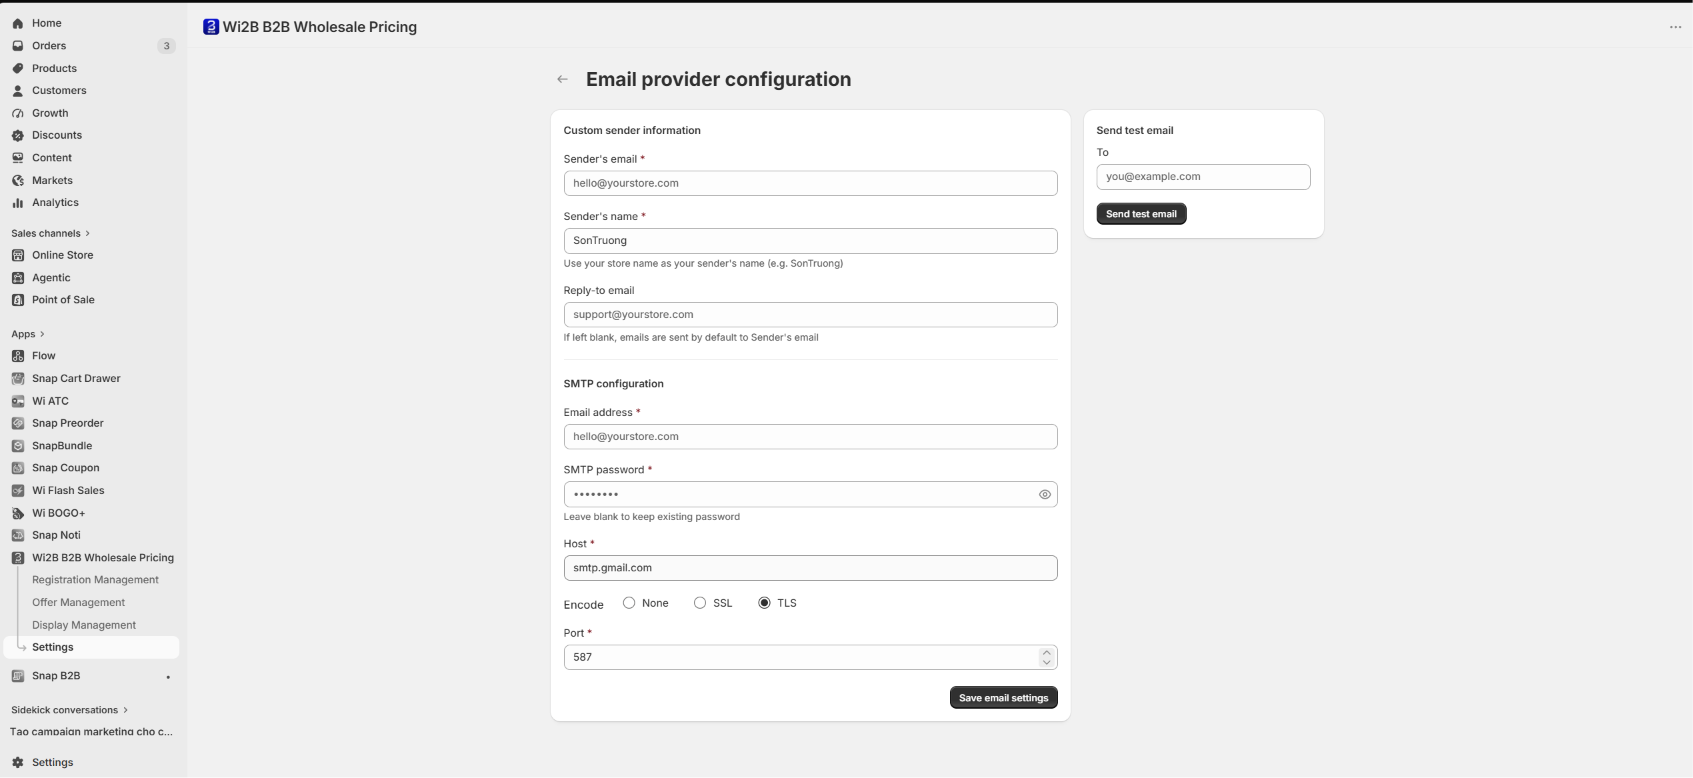
When the Email provider configuration workspace opens, fill in the required fields:
Custom sender information
- Sender's email*: The email address your customers will see as the sender.
- Sender's name*: The name that appears next to the email address (e.g., your store name).
- Reply-to email: The email address customers will reply to (If left blank, emails are sent by default to Sender's email).
SMTP configuration
- Email address*: The email account username used to log in to your email service.
- SMTP password*: The password for that account (preferably an App Password). You can leave this blank on subsequent edits to keep the existing password.
- Host*: The server address of your email provider (e.g.,
smtp.gmail.comfor Gmail). - Encode: Select the encoding method required by your provider (None / SSL / TLS).
- Port*: The connection port number (defaults to
587for TLS).
Once completed, click the Save email settings button at the bottom right. A black toast notification showing "Form saved" will appear at the bottom of the screen upon a successful save.
Step 3: Verify the Connection with a Test Email
To verify that your SMTP server is connected properly and that outgoing emails do not end up in Spam folders:
- Locate the Send test email panel on the right side of the screen.
- In the To input field, type your personal email address.
- Click the Send test email button.
- Check your personal inbox to confirm that the test email arrived successfully.