
Guide to Setting Up Your Wholesale Registration Form
1. Manage Form States (Form list management)
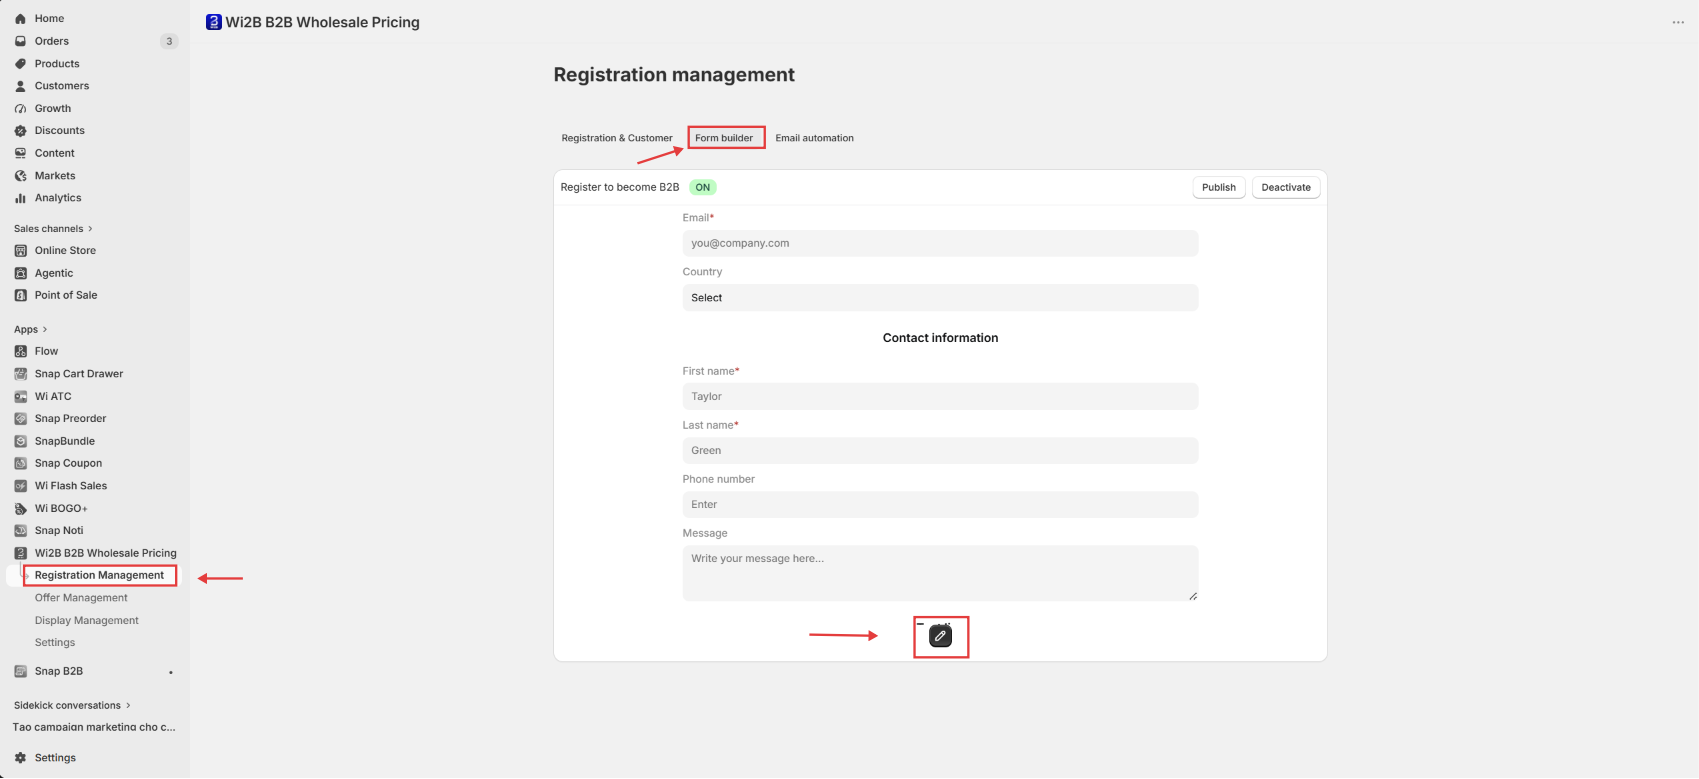
To get started, open the Wi2B B2B Wholesale Pricing app from your Shopify Admin dashboard, and select Registration Management from the left navigation menu. By default, the app will open the Registration & Customer tab. Click the Form builder tab from the top navigation bar to access the registration form card:
- ON status (Green badge): The form is active and ready for customers. You can click Deactivate to temporarily hide the form.
- OFF status: The form is temporarily disabled. You can click Activate to make the form live again.
- To start customizing the layout and fields of your form, click the circular black pencil button (Edit) at the bottom center of the preview card. The system will open the form customizer workspace (Form Builder).
2. Understand the Form Builder Workspace
The form customizer workspace (Form Builder) is designed with a simple and intuitive 2-column layout:
- Left Column (Sidebar): The central control panel with two tabs — Settings and Element — at the top.
- Right Column (Canvas): A real-time visual preview of your registration form. Any changes made in the left column are instantly reflected here.
3. Configure General Form Settings (Settings)
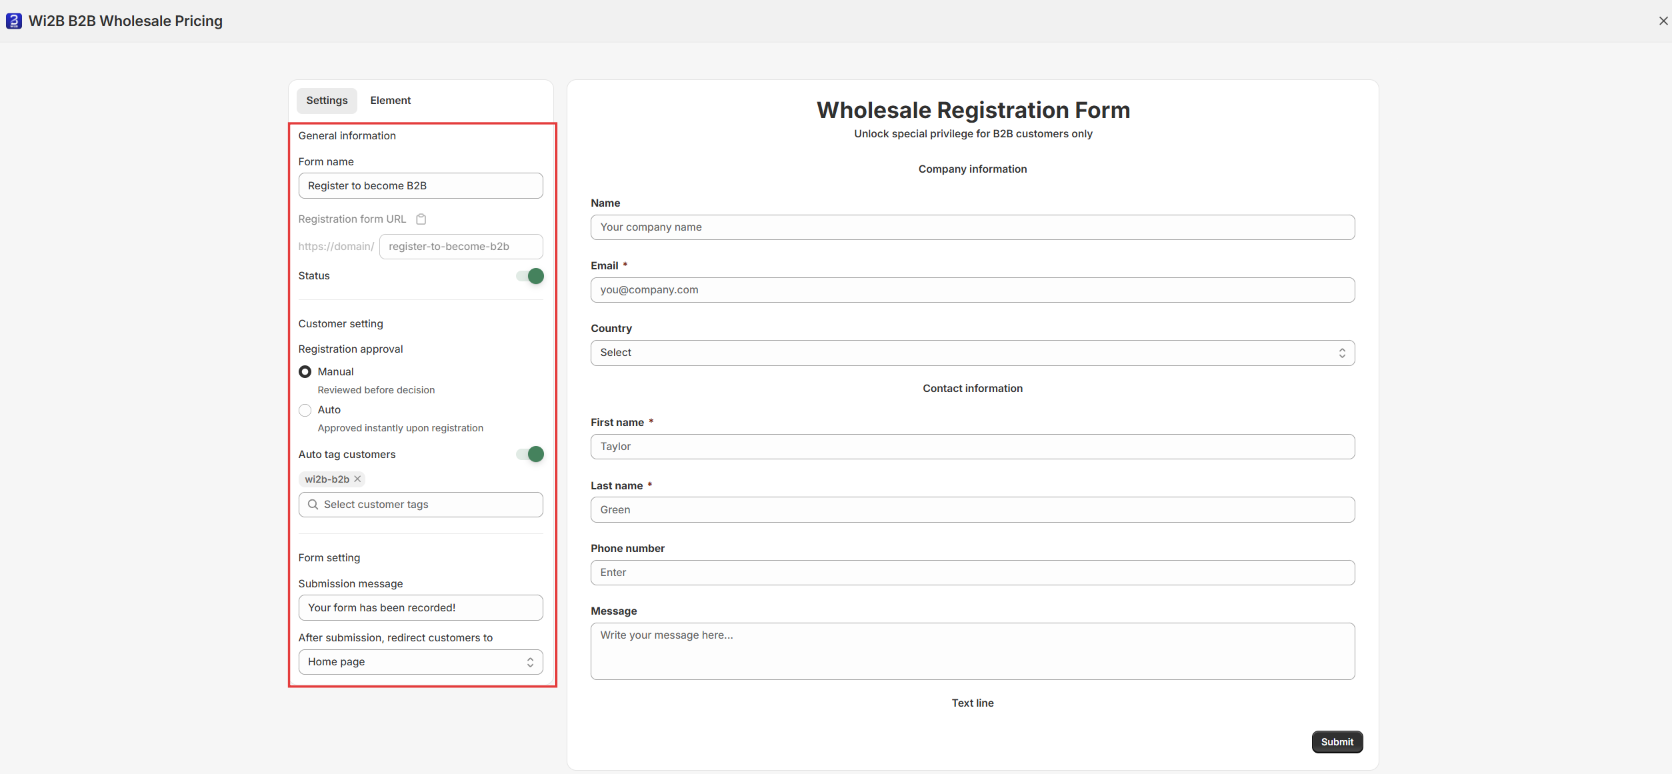
When you open the Form Builder, the left sidebar defaults to the Settings tab. This is where you configure the high-level operational settings for your B2B registration form:
General Information (General information)
- Form name: Set an internal name for your form for easy management (e.g., Register to become B2B).
- Registration form URL: Displays the live public URL link of your registration form with a quick-copy button.
- Status: Toggle this switch to activate or deactivate the form.
Customer Settings (Customer setting)
- Registration approval: Choose the approval workflow for new partner registrations:
- Manual (Reviewed before decision): Registrations will be held for review, allowing you to verify business credentials before activating B2B accounts.
- Auto (Approved instantly upon registration): Partner accounts are automatically approved immediately upon submission.
- Auto tag customers: Toggle this switch to automatically tag customers (e.g.
wi2b-b2b) once their B2B accounts are approved.
Form Settings (Form setting)
- Submission message: Enter a custom message displayed to partners after they submit the form successfully (default: Your form has been recorded!).
- After submission, redirect customers to: Select the target page to redirect partners to after a successful submission (e.g., redirecting back to the Home page).
4. Add and Customize Form Fields (Element)
To design the specific fields and questions on your form, click the Element tab in the left sidebar.
Adding Fields to Your Form
Simply drag the field you want from the Element library list on the left and drop it into the desired position on the Canvas on the right. The Element library offers built-in fields including:
- Layout elements: Header, Footer.
- Input fields: Text line, Text response, Number, Email, Phone number, Country, Radio button, Checkbox, Dropdown, File upload, Date time, URL, Terms and Conditions.
Customizing Individual Field Properties
When you click on any element on the Canvas, its detailed property configuration panel will open in the middle column. Here is how some representative fields work:
A. Configure the Form Title (Header)
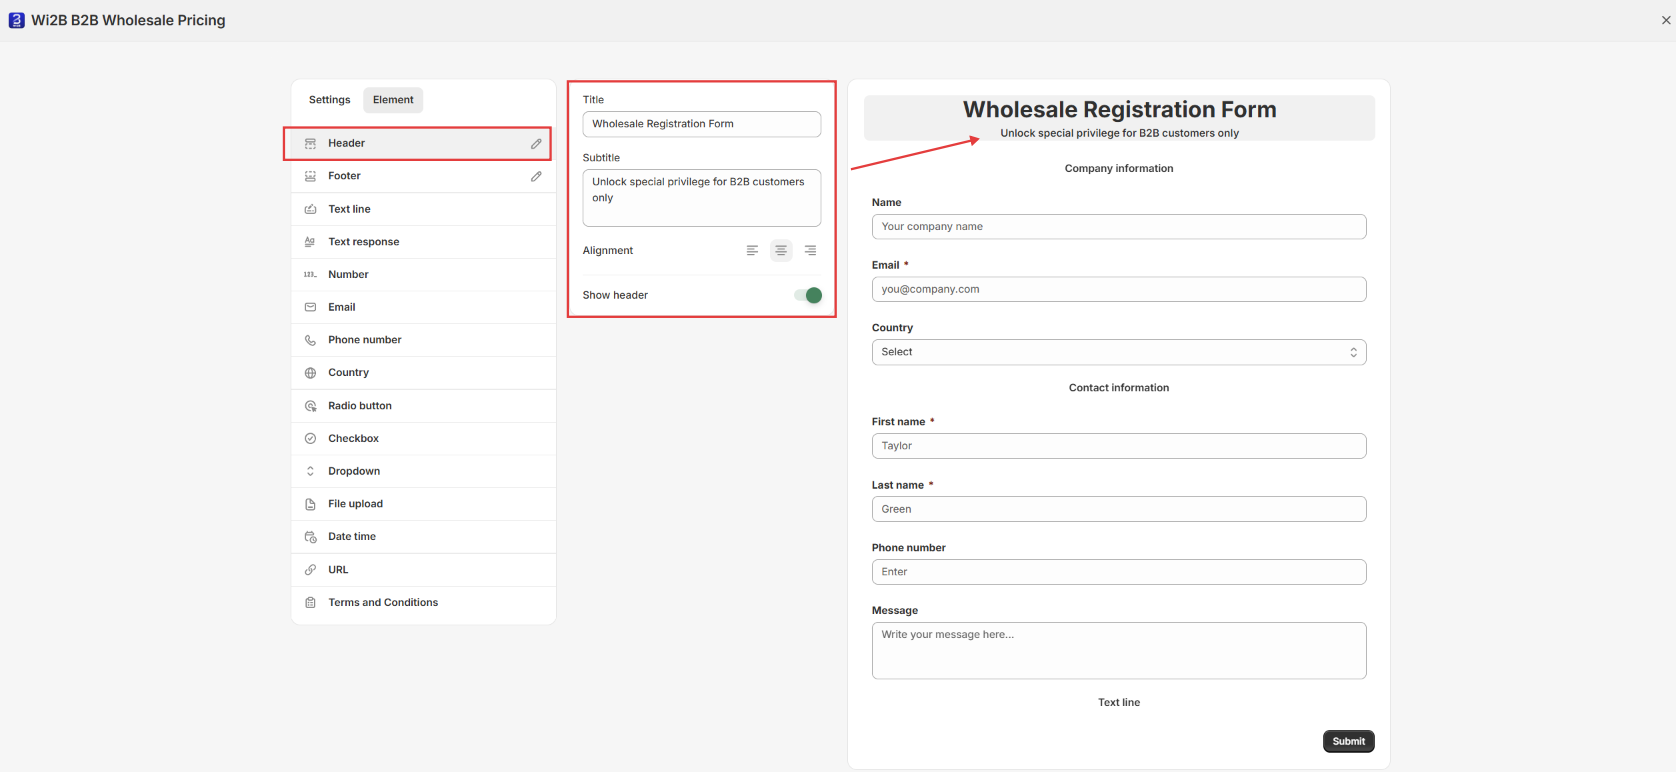
Clicking on the Header element on the Canvas allows you to edit:
- Title: The main title of your form (e.g., Wholesale Registration Form).
- Subtitle: A short description text underneath the title.
- Alignment: Choose text alignment (Left, Center, Right).
- Show header: Toggle to show or hide the header element completely.
B. Configure the Bottom Section (Footer)
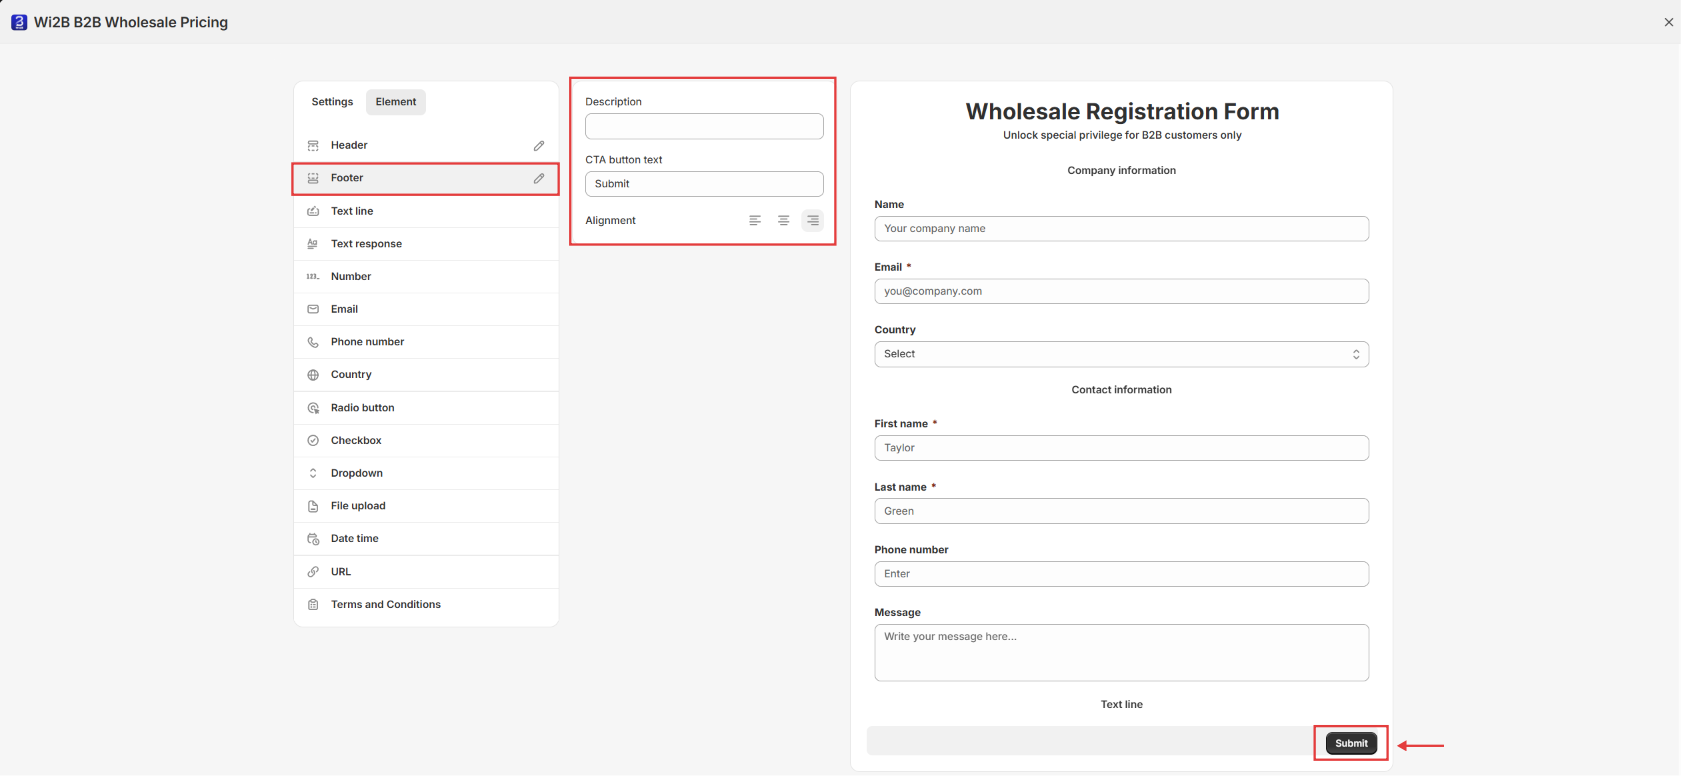
Clicking on the Footer element on the Canvas allows you to edit:
- Description: Content shown at the bottom of the form.
- CTA button text: Change the submit button label (default: Submit).
- Alignment: Select alignment for the submit button and footer text.
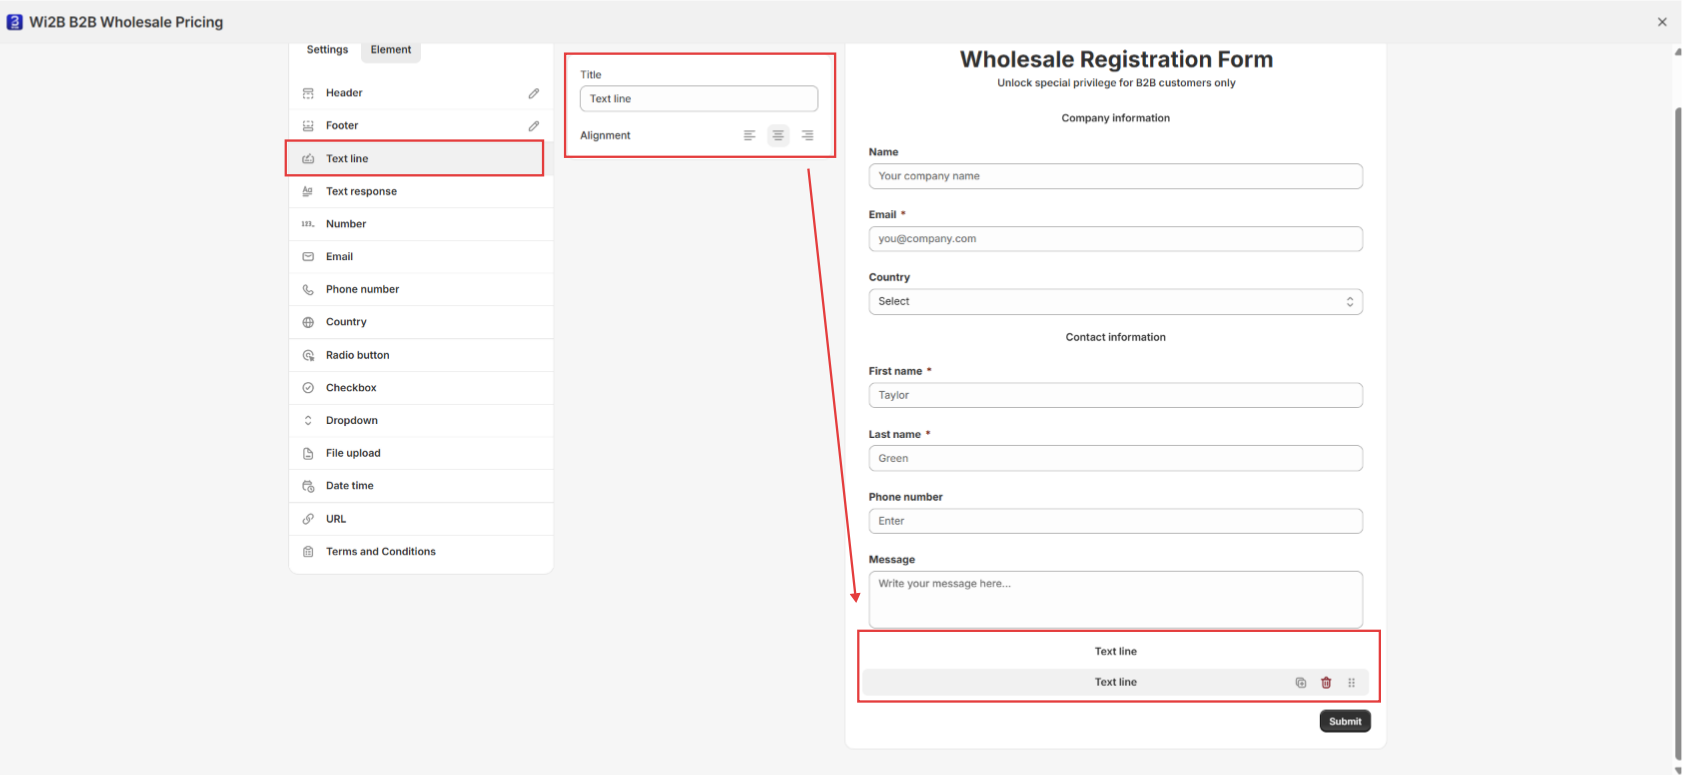
C. Configure Input Fields (Representative: Text line)
Clicking on a Text line input field on the Canvas allows you to configure:
- Title: Change the display label of the field (e.g., rename it to Company Name).
- Alignment: Select text alignment for the label.
- Quick Actions on Canvas: When hovering over a field on the Canvas, you can quickly duplicate it (Duplicate icon), delete it (Trash icon), or drag the six-dot handle to reorder the fields.
5. Save and Publish Your Form
- When you make any changes to the fields or settings, a floating banner saying Unsaved changes with Discard and Save buttons will appear at the top center of the screen. Click Save to apply your changes.
- To exit the Form Builder workspace, click the close (X) button at the top-right corner of the screen.
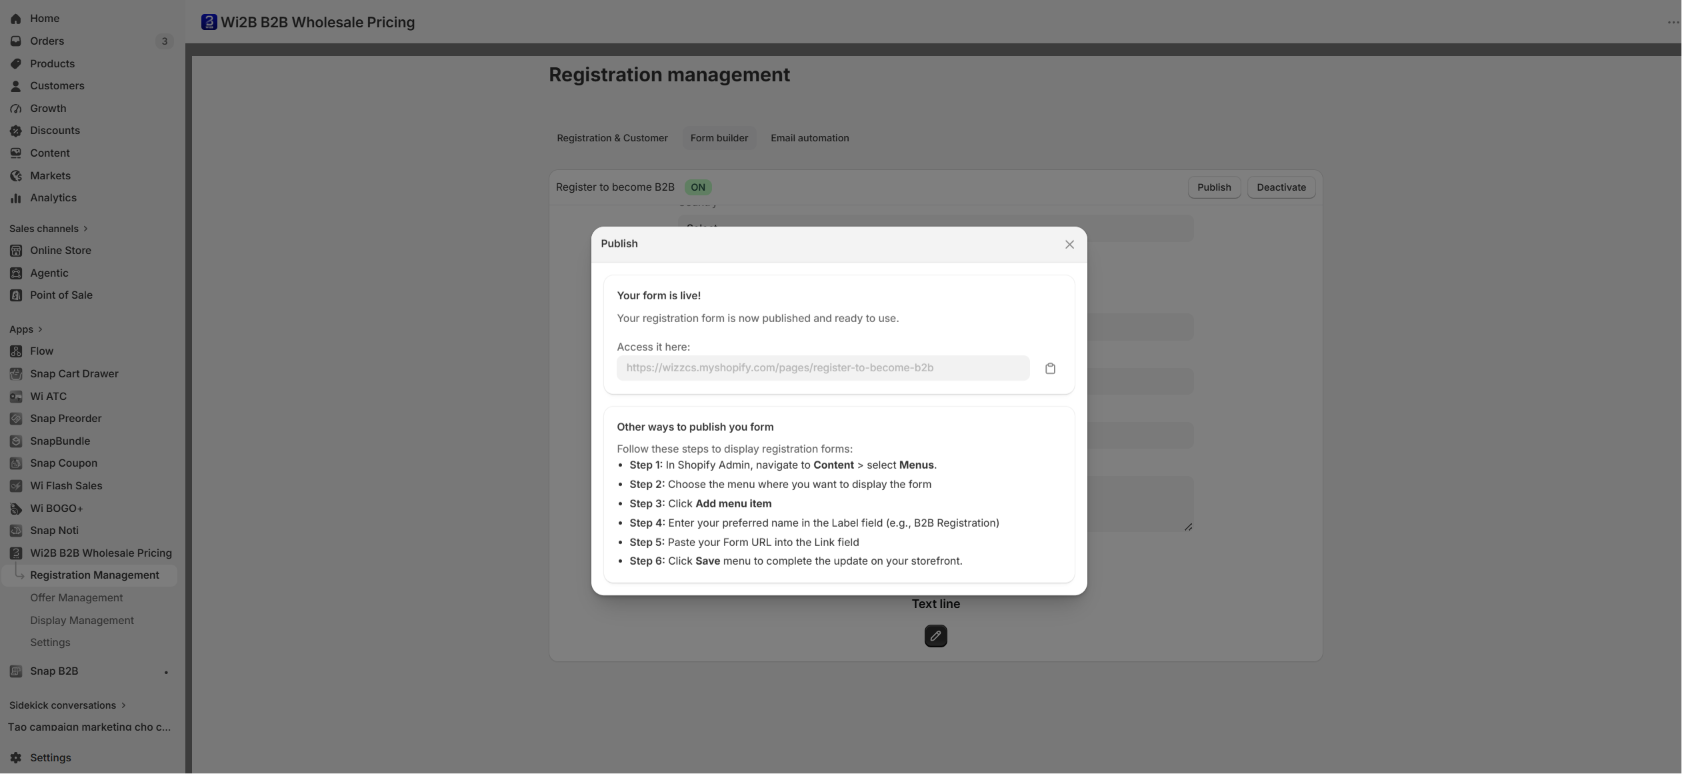
- Back on the main management screen, click the Publish button at the top-right to open the sharing modal. You can copy the public Form URL or view the step-by-step guide to add the form link to your Shopify Admin navigation menus:
- Step 1: In Shopify Admin, navigate to Content > Menus (or Online Store > Navigation).
- Step 2: Choose the menu where you want to display the form (e.g., Main menu).
- Step 3: Click Add menu item.
- Step 4: Enter your preferred name in the Label field (e.g., B2B Registration).
- Step 5: Paste your Form URL into the Link field.
- Step 6: Click Save menu to complete the update on your storefront.
Need More Help?
If you experience any issues or have questions, please don't hesitate to contact our support team at help@wi2b.com or through our live chat - we're here to assist you!